
This is part 2 of a series. In Part 1, we set up a new Azure Database for MySQL instance and ran a local Spring Boot app with embedded tomcat. In this part of the series, we’ll deploy that application to an Azure Linux VM using only the command line.
In the next post I’ll show you how to deploy the application to a Docker container on Azure App Service Web Apps.
Bruno Borges has also posted a great article on working with Azure Database for PostgreSQL. Check it out! — jOOQ, PostgreSQL, and Serverless: Time for a spin of Java and Relational Data
Prerequisites:
To get the most out of this post, you’ll have to follow though the first post and prerequisites.
In addition, you’ll need:
- If running Windows 10, set up Windows subsystem for Linux:
-Control Panel > Programs > Turn Windows Features On Or Off.
-Enable the “Windows Subsystem for Linux” option in the list, click “OK”.
-You may be prompted to restart your computer. - Otherwise, use http://shell.azure.com. Note that management of the SSH key is a little trickier here.
- If you’re on a Mac, just make sure you have the Azure CLI installed.
Verify your account credentials via the command line
To make sure you’re logged in to your azure account, type az account list. If you’re not logged in, type az login and follow the prompts.
Compile the Spring Boot application for deployment
In part 1, we use the following maven command to compile and run the application:
mvn package spring-boot:run
To deploy the application to a vm, we just need to compile and deploy the .jar file using the mvn package command, which will generate a file in the target directory called todo-app-java-on-azure-1.0-SNAPSHOT.jar
Create a Linux VM on Azure
There are several ways to create a new Linux VM on Azure, for this article, we’re going to go with the command line, using the az vm create command.
NOTES:
- Use the same location as the resource group you created in part 1.
generate-ssh-keygenerates a key you can use to log into the VM from this command line- You can use a specific image or the latest image (
ubuntultsfor the latest ubuntu)
az vm create -n <vm name> -g <resource group from part 1> -l eastus2 — generate-ssh-key — image “Canonical:UbuntuServer:16.04-LTS:16.04.201702240”
If successful, this command returns something like this. Make note of the PublicIpAddress for later:
ResourceGroup PowerState PublicIpAddress PrivateIpAddress MacAddress Location
— — — — — — — — — — — — — — — — — — — — — — — — — — — — — — — — — — — — — — — — — — — — — —
rgJan2018 VM running 152.23.190.52 10.0.0.4 00–0D-3A-00-C0–0E eastus2
Open port 8080
Next, open port 8080 on the target VM:
az vm open-port -n <vm name> -g <resource group from part 1> — port 8080
This should return:
Location Name ProvisioningState ResourceGroup ResourceGuid
— — — — — — — — — — — — — — — — — — — — — — — — — — — — — — — — — — — — — — — — — — — — — — — — — —
eastus2 bbmysqlvmdemo42NSG Succeeded rgJan2018 c9e163fc-a9e4–4975-aa9f-1254e0bee9335
SSH into the VM
Get into the VM with the SSH key you generated as part of the az vm create command. Use the <username> from your VM — if no <username> was specified, then your account email to the left of the @ is usually the default.
ssh <username>@< PublicIpAddress>
You should get this response the first time. Say yes.
The authenticity of host ‘< PublicIpAddress> (< PublicIpAddress>)’ can’t be established.
ECDSA key fingerprint is …………
Are you sure you want to continue connecting (yes/no)? yes
Warning: Permanently added < PublicIpAddress> (ECDSA) to the list of known hosts.
Next, make sure you have the latest Linux available, and add OPenJDK 8:
Prep the VM
sudo apt-get update
sudo apt-get install -y openjdk-8*
Copy the Java app to the VM
You’re now ready to transfer the files to the VM. The easiest way is scp (secure copy).
If you’re using Windows subsystem for Linux, use mnt to source the file to copy. Here’s an example from a using a user’s documents directory:
scp /mnt/c/Users/<username>/Documents/GitHub/todo-app-java-on-azure/target/todo-app-java-on-azure-1.0-SNAPSHOT.jar <username>@< PublicIpAddress>:~/
Run the app on the VM
Next, run the file on the vm:
java -jar target/todo-app-java-on-azure-1.0-SNAPSHOT.jar
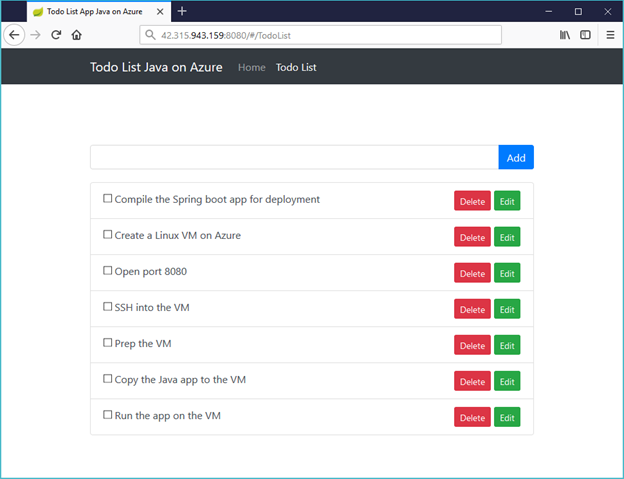
The app can be accessed at:
http://< PublicIpAddress>:8080/
That’s it for today! Tomorrow I’ll show you how to create a dockerfile for the app, then deploy the containerized app to the cloud.. See you then!

Leave a comment